|
Once
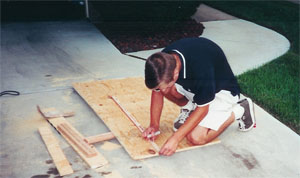
all the cutting, drilling, and sanding was done, I came up with a piece
that looked like this. Now became the somewhat challenging part for me.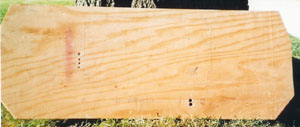 I had to figure out how I would be finishing the amp
rack--vinyl, carpet, leave it ghetto style? As you see I decided to
carpet it to go with a more stock appearance. I ran all the wires to
the locations where they were to be connected to the amplifier.
The finished product ended up turning out very well and hid all wires
just as I wanted it to be. It still kept that stock, clean look. I had to figure out how I would be finishing the amp
rack--vinyl, carpet, leave it ghetto style? As you see I decided to
carpet it to go with a more stock appearance. I ran all the wires to
the locations where they were to be connected to the amplifier.
The finished product ended up turning out very well and hid all wires
just as I wanted it to be. It still kept that stock, clean look. 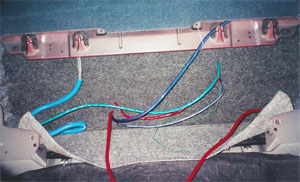 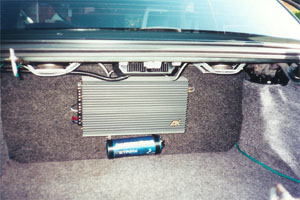

Months
Passed
After a few months passed by, and more
trips to ABT Electronics, I saw that they were closing out their line
of IMAGE DYNAMICS. First thing I saw was another 12" IDQ subwoofer. For
the price I could not pass this deal up and started thinking about how
I would be running 2 subwoofers in my system. It didn't stop there.
About another month passed when the refrigerator in the house went out.
Time for another trip to ABT Electronics. This time
I saw a set of IDQ 6's on clearance for a remarkable price. Had to get
them. Christmas was coming near and I thought "what a good gift to ask
for now would be an Image Dynamics components set." Perfect timing
helps and on Christmas I received my new set of Image Dynamics 5.25
component set with silk dome tweeters.
Time
to start thinking of a new amplifier, rewiring the entire car, and
making subwoofer boxes. I decided to use Medium Density Fiberboard
(MDF) to construct my boxes. Reason I made two boxes instead of one
large one was to be able to break down the system easily.
Next
thing I did was to rip out all the seats and dampen the floor boards. I
used Dynamat Original on the entire floor boards. On top of the Dynamat
to further assist in dampening road noise, I laid some jute down.
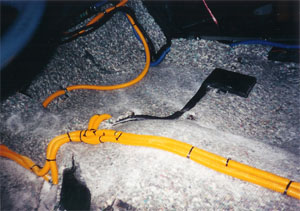
Finally came the easier part, laying down the new wiring for all the
speakers, which I ran down the center of the vehicle in yellow wire
loom.  Left side, or the driver's side, of the vehicle had the
power wire run, and the right side, passenger's side, of the vehicle
had the remote turn-on, and the interconnects. I tried to separate the
wires as much as possible to eliminate any unwanted interference. Left side, or the driver's side, of the vehicle had the
power wire run, and the right side, passenger's side, of the vehicle
had the remote turn-on, and the interconnects. I tried to separate the
wires as much as possible to eliminate any unwanted interference.
A few
weeks, or months, passed by (as time flies) before I began researching
about a subwoofer amplifier. Do I get a another ESX? Do I look for a
mono-channel amp? What do I do? Well, I ended up getting a Directed
1100d mono-block amplifier made by DEI Electronics. This amplifier's
output was larger than my subs recommended, but as long as I was
careful while tuning the system, I would be just fine and had plenty of
head room for the future.
After
having the basics of the system completed, I wanted the visual presence
of the audio components in the trunk to be aesthetically pleasing to
the eye. Something that could be show worthy, but at the same time
doesn't sacrifice trunk space too much. Sure I have now a smaller
compact trunk, but I can still easily get many items in there without a
problem. (PLACE A FINISHED OVERALL PICTURE OF THE TRUNK HERE)
The
Future
In the future, I would like to experiment more with
fiberglass and possibly redo the entire trunk. I would also consider
redoing many other items in the car as well. Check back and see if
anything has changed.
To see all the install
pictures that are online click here.
|


 ESX
Quantum 1204 amplifier. This unit for those unfamiliar with ESX Quantum
Series amplifiers was made in the United States by Zed Audio
(manufacturers of such as Zapco, US Acoustics, and Lanzar). Since then,
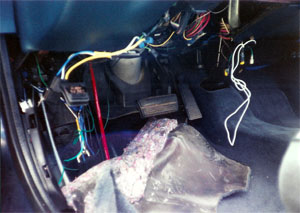
ESX has moved to have their products produced overseas. I ran a 4
gauge power wire through the firewall down the drivers side to the
trunk.
ESX
Quantum 1204 amplifier. This unit for those unfamiliar with ESX Quantum
Series amplifiers was made in the United States by Zed Audio
(manufacturers of such as Zapco, US Acoustics, and Lanzar). Since then,
ESX has moved to have their products produced overseas. I ran a 4
gauge power wire through the firewall down the drivers side to the
trunk.